RallyCalc
v 1.1
July 31, 2002
Contents
Overview
Installation
The Interface
Operation
RallyCalc is a freeware program for the Palm OS. It assists in doing calculations for TSD Rallying. In particular, it is designed for use in Ontario, Canada where navigational rallies are timed to the second. Hopefully it will be of use in other parts of the world.
This program calculates the ideal time due for given distances, and helps to time into checkpoints correctly.
RallyCalc was written using the NSBasic development platform (www.nsbasic.com). In order to operate, this system requires a runtime component to reside on the palm called NSBRuntime.prc as well as a math library called MathLib.prc.
Simply install RallyCalc.prc, NSBRuntime.prc and MathLib.prc on your Palm like any other program.
RallyCalc is designed to take a start distance, a start time and a speed, and give you the time that you should arrive at a finish distance. It does not hold more than one speed at a time, so you cannot work ahead in the instructions and pre-input speed changes.
The main window looks like this:

Figure 1
The Numeric input section is where you enter values. They show up in the Scratchpad area, like a calculator. Pressing 'C' clears the scratchpad display to zero.
The Time Area shows what time you are due to arrive at the distance shown in the spaces below it. The 'Rally Dist' field shows the distance according to the route instructions. The next field below it shows what the odo on the car will read. These may or may not be the same depending on the correction factor for your odometer.
The Average Speed section shows the current speed that is being used for calculations.
The "I see a checkpoint" button takes you to another screen that allows you to finesse your way into a checkpoint.
The Other Functions area has buttons for adding pauses, undoing the last entry, and a menu button for other functions.
The button in Figure 1 labeled 'N Acc' is a "Soft Button". This means that the button in that position will change functions depending on what options you have selected in the Options page.
Before the start of the rally, it is important for the proper function of RallyCalc to accurately set the Palm's clock. You can do this using the Preferences area of the Palm, or using any third party clock software. I personally like Big Clock - http://www.paessler.com/rupp/bigclock.htm . You may use 24 hour time if you like, but I prefer to use 12. To make things easy for myself, I set the clock to read 8 am even if the rally starts at 8 pm. Otherwise I'd have to input times as 20:00 hrs. A common problem that people have is not setting the Palm's clock to am.
Figure 2 shows the Menu Screen. You get here by tapping the 'Menu' button on the main screen.

Figure 2
This screen shows a list of some of the other functions that are usually only needed once in a while.
The Option screen can be reached by tapping the Options' button on the Menu screen.
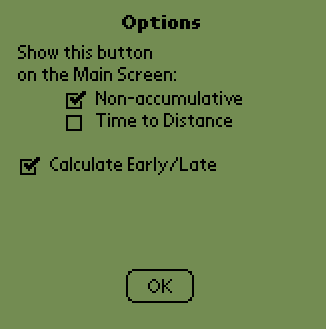
Figure 3
The first option, shown in Figure 3, allows you to choose the function of the Soft Button. You can either have the button operate as a Non-accumulative Distance calculation, or as a Time to Distance function. These are explained in greater detail later.
The second option is whether or not to calculate and display the Early/Late information. The function is quite useful for finessing timing, but surpressing the display will cause RallyCalc to operate more quickly for instantaneous timing. Older and slower Palms may find it better to surpress the Early/Late calculation.
The start of the rally will always include an odometer check. This allows you to compare your car odometer with the distances given in the route instructions.
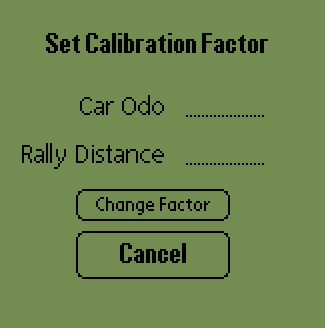
Figure 4
When you arrive at the end of the odometer check, take note of the distance shown on your odometer. From the menu screen, press the 'Calibration' button. This will take you to the screen shown in Figure 4. Using Graffiti, enter the distance on your car's odometer in the 'Car Odo' field. Then enter the distance given in the route instructions in the 'Rally Distance' field. To finish, press the 'Change Factor' button. This is the factor that will be used to display your car's odometer reading on the main screen. Hitting 'Cancel' will take you back to the main screen without making any changes.
On the Main screen (Figure 1), enter the distance of the odometer check as given in the route instructions. Use the keypad on the screen; Graffiti will not work in this screen. When you have finished entering the distance, tap the 'Rally Dist' area of the screen. This will set the distance as a starting point.
The 'Car Odo' section will now display the equivalent distance for your odometer. This is a representation of the rally distance modified by the calibration factor.
In Summary:
1. Input Car Odo and Rally Distances
2. Tap Change Factor button
3. Input the Rally Distance on the Main screen
4. Input the time you are supposed to leave the odo
check
Now you can set the time that you are schedules to leave the odometer check. Using the keypad, enter the hour followed by the decimal point, then the two-digit minute and two-digit second. You may use 24-hour time if you like. For example, 11:07:51 would be entered as 11.0751. Next tap on the 'Time Due' area of the main screen. This enters the time for the distance displayed in the odometer areas.
To set the average speed that you should be travelling at, enter the number using the keypad. Then, tap the 'CAS' area on the main screen. CAS stands for Commence Average Speed. The speed you entered will now be shown in the CAS display.
Whenever you tap an area of the main screen to set a value from the scratchpad, the 'Undo' button lights up. Hitting the Undo button will revert the last value that you changed to the previous value. Fields that can be undone are "Time Due', 'Rally Dist', 'Car Odo' and 'CAS'.
Once a distance, a start time and a CAS have been entered, you are now ready to move on and calculate the time due for another distance.
Using the keypad, enter the distance for the next intersection that you want a time for. Then tap the 'Rally Dist' area. Now the 'Car Odo' field will display the equivalent distance for your car odometer. The 'Time Due' field will show what time you should arrive at that distance, using that CAS. You can continue on using this technique for as many intersections as you like. This gives you an idea at each intersection of how close you are to the ideal time.
Once you are approaching the distance for the next speed change (ensuring that there will be no checkpoint before then), enter the exact distance for the speed change. The 'Time Due' area will show the appropriate time for that distance. Now put in a new speed and tap the 'CAS' area. From there, you can continue to enter new distances using the new speed for your calculations.
This is the key to the whole system. You do not need to enter any other distances along the way. However, you must enter all of the speed changes at the right distances.
At any time, you can get a display of how early or late you are on the route. Enter a distance that you are approaching on your odometer, and when you reach that distance tap in the 'Car Odo' area. This will now show you what the actual rally distance is, what time you are due there, and most importantly it will display how early or late you are. The early/late display is shown under the 'Time Due' area.
It takes about 2 seconds to show this information, but it is based on the time that you hit the button, not the time is gets displayed. It is possible to surpress the Early/Late display in the Options screen. This saves some time in the calculation.
This feature is entirely dependant on the accurate setting of the internal clock. Don't forget to set the Palm's clock before the rally.
At some point you will be driving along and your driver will exclaim "I see a checkpoint!" Now is when the big 'CP' button at the bottom of the screen comes in. Press it immediately.
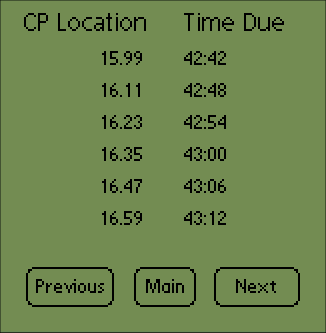
Figure 5
You will now be taken to a screen that looks something like Figure 5. This screen shows the next six tenths of a minute, along with the associated distances (factored for your odometer). Using Figure 5 as an example, you should ask the driver "Does it look like it will be at 15.99 km?" He might say "No, a little further away than that." You try "16.11???" He responds "Yeah, that sounds close." You can then tell him to arrive at 42 minutes and 48 seconds.
Bear in mind that this (and any other) information will only be accurate if you have been correctly entering the speed changes at the proper distances.
For clarity, only the minutes and seconds are shown in the Time Due column.
If you need to move forward or back to the next set of six tenths, you can hit the 'Next' or 'Previous' buttons. Hit the 'Main' button to return to the main screen.
When you arrive at a checkpoint, the sticker you get will show you the exact distance and the time you are required to leave. First enter the distance and tap the "Rally Dist' area. Then enter the out time and tap the 'Time Due' area. Now you may continue on entering distances as usual.
At some point in your rally career, you are likely to go off route. Without a rally odometer, this can be very frustrating. RallyCalc allows you to use an offset in your odometer displays for these occasions.
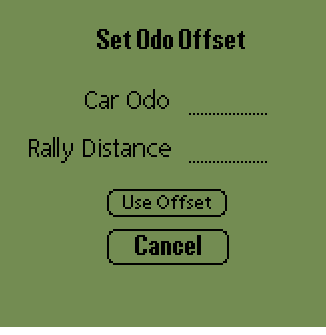
Figure 6
When you go off route, first of all find your way back. Then get to a point in the rally where you know the exact distance (like a known intersection). Now, from the menu screen tap 'Odo Offset'. You will be taken to the screen shown in Figure 6. In the 'Car Odo' field, use Graffiti to enter the distance shown on your car's odometer. Then enter the known distance in the 'Rally Distance' field. When you tap the 'Use Offset' button, these numbers are entered.
Tapping 'Cancel' will not use the numbers entered.
Now, on the main screen the 'Car Odo' distance will reflect not only the calibration factor, but also the extra distance traveled off route.
It is also useful to use this function if you see that your odometer is consistently off from the given distances. This can be caused by wheel spin or other factors. Being off by a tenth of a kilometer can often mean being off by a tenth of a minute, so correcting often is wise - if you have time.
At the end of sections you are supposed to reset your odometer to zero. Be certain to enter the final distance for the section into the main screen so that the time at EOS is accurate.
To reset RallyCalc for ends of sections, hit the 'Menu' key. Then, on the Menu screen, tap the 'EOS Reset' button. This resets the odometer readings to zero while leaving the time alone. This also resets any offset you may have entered, because now you and the rally are both back at zero.
Pauses can be entered at any time into RallyCalc. Use the keypad to enter the pause in seconds. i.e. 2:15 is 135. Then press the 'Pause' key. This adds the pause to the time but doesn't change the distance.
Negative pauses cannot be entered. If you need it, I suggest doing the math and re-entering the new time.
Many rally sections are given to you using non-accumulative distances. If that is the case, go to the Options page and select the 'Non-accumulative' button to be displayed. This makes the Soft Button show 'N Acc'.
On the Main screen, enter the non-accumulative distance and tap the 'N Acc' button. This adds the entered distance to the current Rally Distance and updates the Time Due and the Car Odo fields.
This is another function that can be undone with the 'Undo' button.
This is especially useful for Waffle Diagrams. In a waffle diagram, you are given three non-accumulative distances to choose from. Only one is correct. Start with the lowest of the three and hit the 'N Acc' button. See if there is a matching intersection at the Car Odo distance shown. If it doesn't match, tap the 'Undo' button and enter the next possible non-accumulative distance.
Some rally sections give you times to travel instead of distances. For example, they say "Travel for 36 seconds at 68 km/h and then turn left." RallyCalc has the ability to convert these times to distances.
Go to the Options page and choose to have the 'Time to Distance' button be displayed. This makes the Soft Button show 'T to D'.
On the Main page, you can now enter a time, in seconds, and tap the 'T to D' button. The resulting distance is added to the Rally Distance and Odo Distance displays, and the time due is shown in the Time Due field.
There are a couple of extra rally tools that are included with RallyCalc. They can be accessed from the Menu screen and tapping 'Tools'. More tools are slated to be added in future releases of RallyCalc

Figure 7
Figure 7 shows the Tools screen. Tapping 'Main' gets you back to the Main screen, while tapping one of the other buttons takes you to that tool.
The first tool available is Clock Faces. Tapping that button takes you to this screen:
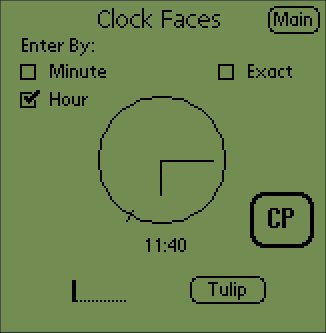
Figure 8
This is a tool to help you solve simple clock face instructions. In this type of instruction, you are given a time of day, and asked to follow a tulip made out of the analog clock representation of that time.
Using the checkboxes, you can select if you are entering by the minute or the hour. Use Graffiti to enter the time without any colons or periods. 6:15 would be entered as just 615. Now hit the 'Tulip' button to draw the time as a tulip. The display will always rotate the clock to show your entry point at the bottom of the screen. For confirmation, the tick on the circle represents 12 on the clock. The digital time of the tulip is also shown under the diagram.
Figure 8 shows an example of a tulip for 11:40. Since you are entering by the hour, the clock is rotated so that 11 is right at the bottom of the display, and the minute hand shows the exit of the intersection as a right turn. The tick shows where the 12 is on the clock in order to help you visualize the clock.
If you select the 'Exact' checkbox, displays are drawn accurately - as though the hour hand moves along the clock as the minute value gets higher. For example at 8:55, the hour hand is almost pointing at the 9 position. If Exact is not selected, the hour hand would still point directly at the 8 position regardless of the minute hand.
Tapping 'Main' will take you to the Main screen, while tapping 'CP' will take you directly to the instantaneous checkpoint screen.
From the Tools screen, tapping 'Road Counting' will take you to the other available tool.
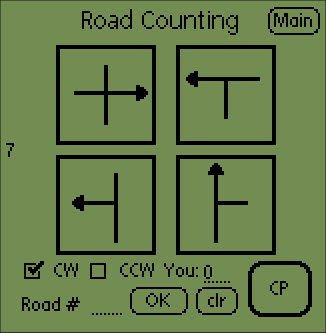
Figure 9
This tool helps to solve road counting sections. In this type of section, you are given a number, and you are to count either clockwise or counter-clockwise up to that number and exit the intersection on that road.
This screen has checkboxes to select clockwise (CW) or counter-clockwise (CCW). It also has a field where, using Graffiti, you input what number road you are approaching the intersection on. This number will be given in the instructions and will change from rally to rally. Be sure that you set these options when using this tool.
Now using Graffiti, input the number of the road given in the instructions and tap the 'OK' button. In Figure 9, the road shown is 7, as indicated in the left margin of the screen. You may also press 'clr' to clear the input area.
The four tulips created are representations of the four most common types of intersections. The arrows point to the direction to leave the intersection. The entry is always at the bottom of the tulip, even though they are not indicated by a dot.
Because you may not know the type of intersection coming up, all of your common options are shown. You can tell your driver in this case that if it's a 4-way turn right, a Tee turn left, a left junction turning left or a right junction straight ahead. If the number given represents a U-turn in any of the intersections, that tulip is not displayed as it is not a legal instruction (in Ontario).
As with the clock faces screen, tapping 'Main' will take you to the Main screen, while tapping 'CP' will take you directly to the instantaneous checkpoint screen.
Due to limitations of the math processor and rounding errors in the Palm, sometimes distances are displayed 1/100th off from those entered. I've chosen to live with these instead of using processing time and power to eliminate them.
You might find it useful to temporarily map one of the hard buttons to RallyCalc. This way you can easily switch between the standard calculator and RallyCalc.
To map a hard button, enter the Palm's preferences area and select 'Buttons' in the top drop-down list. Now choose which button to use, the Memo Pad button for example, and select RallyCalc in that list. Now when you press the Memo Pad button it will run RallyCalc instead of Memo Pad. You can easily return this setting after the rally.
I have decided not to implement a feature to disable the Auto-Off function at this time. If your unit turns off, simply turning it back on will restore all of your data.
Alternatively, you can get a 3rd-party application called AutoOff at http://www.mindspring.com/~jgrand/
RallyCalc is incompatible with PowerHack. If RallyCalc is the active application when you turn on the Palm, you will get an error. You will need to reset the Palm, but no data will be lost.
Similarly, I have found that the security setting to automatically lock the Palm when it is turned off has the same effect. I found this setting in a newer version of the Palm OS.
Please direct any bug reports or feature requests to brooke@brooke.net
Thanks,
Brooke Jacobs